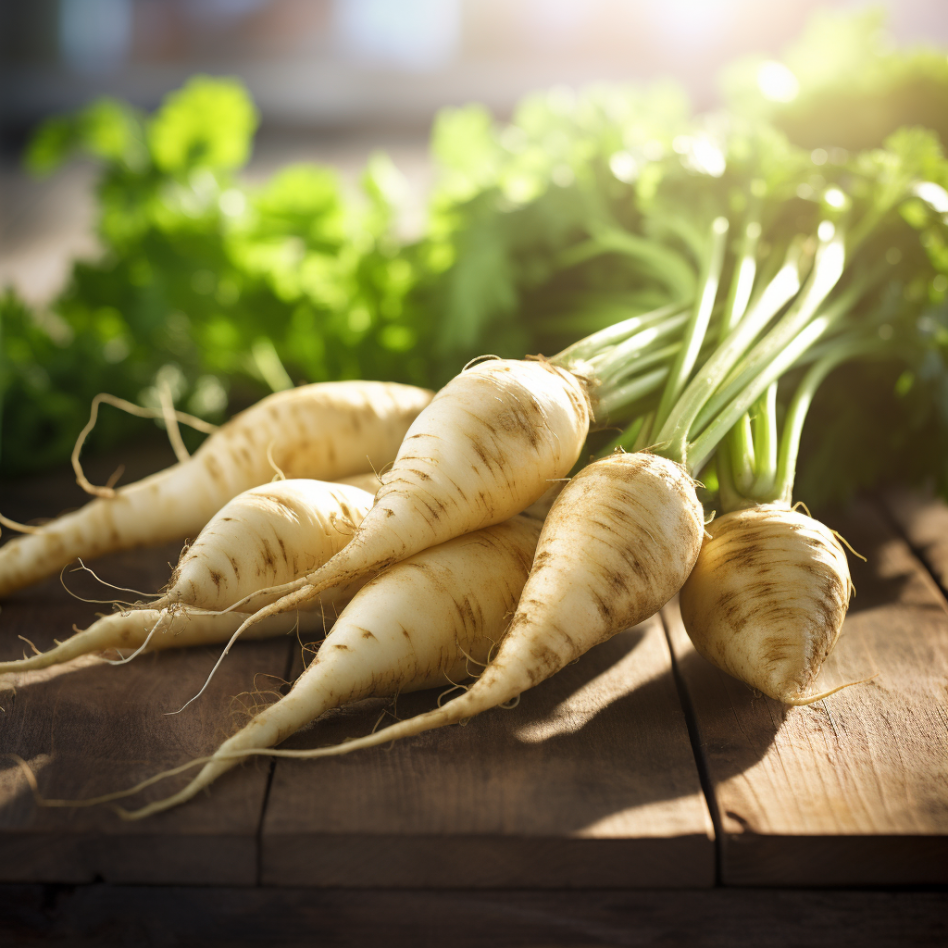
Parsnips are a versatile and delicious root vegetable that can be easily grown at home with proper care and planning. This comprehensive guide covers everything you need to know to start successfully growing parsnips in your own garden. From choosing the optimal planting location to harvesting and storing your crop, we’ll explore each step of parsnip cultivation in detail. With the right conditions and attentive care, you can enjoy homegrown parsnips all season long.
Reasons for Growing Parsnips
Before diving into the specifics of parsnip cultivation, let’s look at why you should consider growing this underrated vegetable:
- Superior freshness and flavor – Homegrown parsnips have an unbeatable sweet, earthy taste and aroma you can’t find in store-bought varieties.
- Cost savings – Purchasing parsnips from the grocery store can get expensive over time. Growing your own is much more economical in the long run.
- Better nutrition – Freshly harvested parsnips contain more vitamins and antioxidants compared to parsnips that have been in storage.
- Fun hobby – Gardening provides stress relief, exercise, and satisfaction from reaping the literal fruits of your labor.
- Novel varieties – You can find interesting heirloom parsnip seeds not typically seen in supermarkets.
- Winter staple crop – Parsnips store well and become sweeter after frost, making them an ideal winter vegetable.
Choosing the Best Location
Proper parsnip care starts with selecting the optimal spot to plant them. Here are the key factors to consider when choosing a location:
Sunlight Requirements
Parsnips need at least 6-8 hours of full sunlight daily. Choose a sunny area of your yard that gets sunlight most of the day. Insufficient sunlight will result in stunted, low-yielding plants.
Soil Quality Considerations
Parsnips thrive in loose, deep soil that drains well. The soil should have plenty of organic matter and a loamy texture. Avoid planting parsnips in dense, clay-like soil.
Here are some tips for preparing ideal parsnip soil:
- Loosen soil to 12 inches deep before planting. Parsnips have long taproots that require deep soil.
- Mix in several inches of aged compost or manure. This adds nutrients and improves drainage.
- Remove any stones, debris, or obstructions. These can impede the downward growth of the roots.
- Rake the soil smooth before sowing seeds. This creates a neat seedbed.
Ideal pH Levels
Test your soil pH with a testing kit. Parsnips grow best in slightly acidic to neutral soil, with ideal pH levels between 6.0-7.5. If the reading is too high or low, adjust accordingly by adding soil amendments.
Adequate Growing Space
Allow at least 1 foot between each parsnip plant. The rows of parsnips should be 1-2 feet apart. Giving them sufficient room prevents overcrowding.
Importance of Good Drainage
Parsnips need consistent moisture but dislike soggy, waterlogged soil. Ensure the planting area has good drainage by choosing a slope or elevated area. Wet soil often leads to rotting roots and disease.
When to Plant Parsnips
Parsnip seeds should be sown in early to mid-spring based on your local climate. Here are some guidelines for timing:
Research First Frost Dates
Determine the average first fall frost and last spring frost dates for your area. This information can easily be found online. Parsnips like cool weather.
Calculate the Planting Window
Count back from the first fall frost date by about 4-5 months. This gives parsnips enough time to mature before cold weather arrives.
Next, count forward from the last spring frost by 2-3 weeks. Waiting until the soil warms up prevents seeds from rotting.
Combining these two timeframes gives you the ideal window for planting parsnip seeds.
Monitor Soil Temperature
Parsnip seeds will not germinate in cold soil. Use a soil thermometer to check that the top few inches of soil have warmed to at least 45-50°F before planting.
Check Soil Moisture Levels
Parsnip seeds need consistently moist soil to sprout and become established. Test the soil moisture before planting. If bone dry, water the area well in advance.
Avoid Hot Weather
Once they’ve germinated, parsnip seedlings can tolerate some heat. But avoid sowing seeds mid-summer when hot, dry spells are more likely.

Preparing the Soil for Planting
Prepping the soil properly gives parsnip seeds the best chance for vigorous growth.
Remove All Weeds and Debris
Eliminate any weeds, roots, sticks or stones from the planting area. Smooth soil allows for neat, orderly rows.
Loosen and Till Soil
Use a shovel, garden fork or tiller to loosen and turn over the top 12 inches of soil. Break up compacted areas.
Add Compost and Fertilizer
Mix 2-3 inches of finished compost into the entire planting area. Compost boosts nutrients and moisture retention.
A 5-10-5 or 5-10-10 balanced fertilizer can also be incorporated per package instructions. Too much nitrogen can cause excessive foliage growth rather than large roots.
Level and Firm the Soil Surface
Creating a flat, uniform planting area allows for even germination. Gently firm the seeds after planting.
Check and Amend Soil pH
Test soil pH a week before planting. Parsnips grow best in the slightly acidic range of 6.0-6.8. Ground limestone raises pH, sulfur lowers it.
Allow Soil to Pre-Soak
Moisten the prepared soil a few days before sowing seeds. This allows it to settle and warm up. Prevent soil from drying out.

Planting Parsnip Seeds
Once your soil is prepped and the weather is optimal, it’s time to sow those parsnip seeds! Here are some key tips:
Direct Sowing Outdoors
Unlike many vegetables, parsnips do not transplant well and should always be direct sown into the garden bed where they will grow.
Planting Depth
Sow parsnip seeds about 1/2 inch deep in the prepared soil. Seeds sown too deep can struggle to break through the surface.
Seed Spacing
Space parsnip seeds about 1 inch apart in all directions. This prevents overcrowding as seedlings mature.
Row Spacing
Allow 12-18 inches between each row of parsnips. Wider rows make weeding and harvesting easier.
Water Thoroughly After Planting
Gently water newly planted seeds to settle the soil and enhance contact between seed and soil. Proper moisture is vital for germination.
Consider Using Row Covers
Floating row covers protect tender sprouts from heavy rains, cold snaps and insect pests. Remove once seedlings are established.
Be Patient!
Parsnip seeds take 14-21 days to emerge. Avoid the urge to disturb the soil to check for sprouting.
Caring for Parsnip Plants
Once those little green shoots emerge from the soil, your parsnip planting needs attentive care through harvest:
Provide 1-2 Inches Water per Week
Parsnips have long taproots that need deep watering. Increase frequency during hot, dry periods.
Weed Consistently
Remove weeds promptly to prevent competition for water and nutrients. Weed by hand or use mulch to suppress them.
Fertilize Lightly If Needed
Add a side dressing of balanced organic fertilizer or compost midseason if plants seem nutrient deficient.
Monitor for Pests and Diseases
Watch for leaf miners, webworms, rot and other issues. Remove any insect-damaged or diseased foliage promptly.
Hill Soil Over Roots
As parsnips lengthen, gently mound soil up around the bases to prevent exposure to sun.
Stake Tall Foliage
If tops become very tall and floppy, stake or cage plants to prevent breaking.
Harvest at Maturity
Parsnips reach maximum size and sweetness after exposure to cooler fall temperatures.
Harvesting Parsnips
One of the most exciting and rewarding parts of growing parsnips is getting to harvest the mature roots! Follow these guidelines for harvesting success:
Identifying Mature Roots
Parsnips are typically ready to harvest after exposure to a few light frosts in fall. This converts their starch to sugar, intensifying the flavor. The foliage will brown and die back when fully mature.
Use a Gardening Fork
Avoid just pulling parsnips directly from the soil, as this often results in broken or damaged roots. Carefully loosen the soil all around the roots with a gardening fork first.
Harvesting in Cooler Weather
If possible, harvest parsnips in the morning or evening when temperatures are cooler. This prevents freshly dug roots from overheating.
Remove Soil – But Don’t Wash!
Use your hands to gently remove excess soil clinging to the harvested parsnip roots. Avoid rinsing them until ready to cook.
Cut Back Tops
Trim the leafy tops down to about 1 inch above the crown of the root. Any longer stems can lead to moisture loss.
Check for Damage or Decay
Inspect every harvested parsnip, discarding any that show signs of insect damage, decay, or woody cores. Use only the soundest roots for storage.

Storing Parsnips
With proper storage, parsnips will keep for several months. Here are some storage tips:
- Ideal Storage Conditions: 32-40°F, high humidity
- Store parsnips in fridge drawer or cold cellar in perforated plastic bags
- Avoid exposure to light, heat, or excess moisture
- Check regularly and remove any spoiled parsnips
- Well-stored parsnips can last 3-6 months
Parsnip Recipe Ideas
Once you’ve harvested a bountiful crop of parsnips from your garden, it’s time to enjoy them! Here are some delicious ways to eat parsnips:
- Roasted parsnips – Toss with olive oil, salt, pepper, garlic and roast
- Parsnip fries – Peel, cut into fries, toss with oil and roast
- Parsnip soup – Sauté onions and garlic, add broth and parsnips, blend when tender
- Parsnip puree – Boil, mash with butter, milk and spices
- Parsnip gratin – Layer roasted parsnip slices in gratin dish with cream and top with cheese
- Glazed parsnips – Simmer in butter, brown sugar and spices until caramelized
- Parsnips in stew or pot roast – Hearty winter dishes!
- Raw parsnip sticks with dip – Peel and slice parsnips into sticks, serve with hummus
Parsnip Companion Planting
Certain plants make excellent companion crops for parsnips. Consider incorporating these beneficial companions:
- Bush beans – Repel beetles. Tall parsnips provide shade for beans.
- Carrots – Mask the scent of parsnips, deterring carrot flies.
- Garlic and onions – Repel several root crop pests.
- Lettuce and spinach – These shallow rooted crops won’t compete for nutrients.
- Marigolds – The roots secrete compounds that deter nematodes in soil.
- Potatoes – Root synergistically and improve soil.
- Radishes – Help break up and aerate soil. Fast growing.
- Turnips – Enhance flavor. Similar soil needs.
Avoid planting parsnips near fennel, tomatoes or weedy crops.
The Benefits of Growing Parsnips
Growing your own parsnips provides many rewards. Here’s a quick recap:
- Delicious, sweet flavor when harvested fresh
- Nutrient-dense source of fiber, vitamins C, E and various minerals
- Extremely hardy in cold weather – even after frosts
- Satisfaction of growing your own food
- Can yield high amounts per square foot of garden space
- Tender greens are edible too!
- Stored properly, they will last for months
- Versatile culinary uses – soups, purees, roasted, glazed and more
Tips for Parsnip Success
Follow this checklist for your best parsnip harvest yet:
- Choose compost-enriched soil with full sun exposure
- Direct sow seeds when soil reaches 45-50°F
- Space rows at least 12 inches apart
- Use row covers to protect young seedlings
- Keep soil consistently moist, water deeply
- Weed diligently to reduce competition
- Hill up soil as roots elongate
- Harvest after foliage dies back in fall
- Store freshly dug parsnips in cool, humid conditions
With proper timing, care and harvesting, your parsnip crop will provide an abundant supply of winter root vegetables. These sweet, nutritious roots are worth the patience required. Start sowing parsnip seeds for a forthcoming harvest you’ll relish!