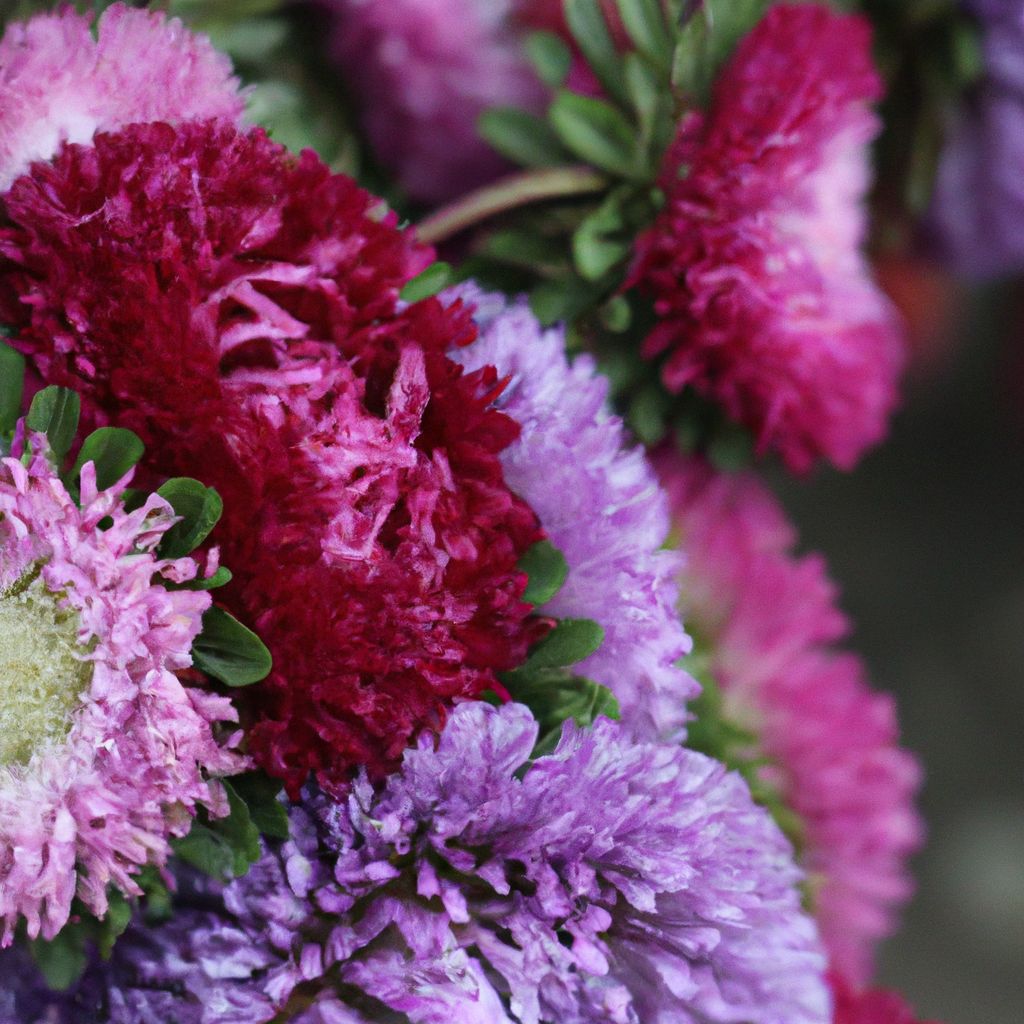
Asters are colorful flowering plants that can add vibrancy and beauty to any garden. Their small, daisy-like blooms come in a variety of colors and appear in late summer into fall. Asters Gardening at home provides the satisfaction of caring for your own plants while also attracting beneficial pollinators to your garden.
With the right care and preparation, it’s easy to successfully grow asters at home. This comprehensive guide covers everything you need to know, from choosing the ideal location to troubleshooting common issues. Follow along to transform your outdoor space with the radiant colors of asters.
Selecting the Perfect Spot
When choosing where to plant your asters, opt for a location that receives at least 6 hours of direct sunlight daily. Asters thrive in the full sun. The area should have fertile, well-draining soil, as asters are susceptible to rot in soggy conditions.
Here are some tips for selecting the optimal location:
- Sunlight: Choose a spot that gets 6-8 hours of direct sun. Asters need full sun to produce abundant blooms.
- Soil drainage: Well-draining soil is crucial. Waterlogged soil leads to root rot. Test drainage by digging a hole and filling with water. If it doesn’t drain within 12 hours, improve drainage before planting.
- Soil amendments: Incorporate 3-4 inches of compost or well-rotted manure to enrich the soil. You can also add peat moss, vermiculite or perlite to improve drainage.
- Avoid low spots: Don’t plant asters in areas that collect water. Standing water promotes diseases. Opt for slightly sloped or raised areas.
- Air circulation: Allow 1-3 feet between plants for air to circulate freely. This prevents mildew and other fungal issues.
- Soil pH: Test soil pH. Asters prefer a slightly acidic pH between 6.0-7.0. Adjust if needed.
If drainage is poor, create raised garden beds or plant your asters on mounds. Avoid low-lying regions prone to water pooling after rains. For optimal growth, test and amend the soil pH to fall between 6.0-7.0.
Preparing the Planting Area
Proper soil preparation sets the stage for success. Remove any weeds, rocks or debris. Work 2-4 inches of organic compost into the top 6-12 inches of soil to improve texture and provide nutrients. Here’s a step-by-step guide:
- Remove any weeds, rocks, planting debris, etc. Discard any diseased plant material.
- Loosen the top 6-12 inches of soil with a spade or tiller. Break up compacted areas.
- Add compost and thoroughly mix it into the soil. Well-rotted manure or peat moss also adds organic matter.
- Consider adding vermiculite or perlite to further enhance drainage.
- Rake the bed neatly and remove any remaining debris.
- Water thoroughly until the soil is moist but not soggy. Allow to rest for 2-3 days before planting.
This gives the amendments time to fully integrate. The bed is now prepared and ready for planting asters!
Installing Asters

Once the bed is prepared, it’s time to plant your asters. Follow these steps:
- Dig holes about twice the width and depth of the root ball.
- Place each aster in its hole, taking care to keep the top of the root ball level with the soil surface. Don’t plant too deeply.
- Gently firm the soil around the base. This removes air pockets.
- Water thoroughly immediately after planting. This settles the soil.
- Consider spacing plants 12-24 inches apart depending on variety. Overcrowding causes issues.
- Apply a 2-3 inch layer of organic mulch around each plant. Mulch conserves moisture and prevents weeds.
- Water the new transplants regularly until they become established. The soil should be kept evenly moist but not saturated.
Proper planting gives asters the best chance to develop a robust root system. Be sure not to plant too deeply and keep soil moist but not waterlogged. With attentive care, your asters will flourish.
Caring Techniques
Consistent, attentive care is vital for asters to reach their full potential. Here are some key care guidelines:
Watering
- Check soil moisture regularly, watering when the top 1-2 inches become dry. Use your finger to test.
- Water deeply, applying about 1-2 inches per week. Light, frequent watering encourages shallow roots.
- Water early in the day to allow leaves to dry out before nightfall. This prevents disease.
- Use soaker hoses or drip irrigation to keep water off leaves and target the roots.
- Reduce watering as fall approaches and the plants enter dormancy.
Fertilizing
- Fertilize every 4-6 weeks during spring and summer with a balanced 10-10-10 or 5-10-5 fertilizer.
- Always follow label instructions carefully. Over-fertilization can harm plants.
- Spread fertilizer evenly around the base of plants, keeping it away from leaves and stems.
- Discontinue fertilizer after mid-August. This allows plants to harden off for winter dormancy.
Pruning
- Prune asters in early spring to shape plants and remove dead stems and foliage.
- Pruning regularly prevents plants from becoming overgrown and encourages dense growth.
- Use clean, sterilized pruners to make cuts just above leaf nodes or buds. Avoid leaving stubs.
- Remove spent flowers after peak blooming to tidy plants. But leave some for pollinators.
- Cut back particularly large or leggy plants by about a third to stimulate branching and compact growth.
Pest and Disease Control
Asters are susceptible to certain pests and diseases. Here are some organic prevention and treatment methods:
- Inspect plants frequently to catch problems early when they are most manageable.
- Remove and destroy heavily infested or diseased plant material. Disinfect tools after use.
- For aphids, spray with insecticidal soap or introduce ladybugs which feed on them.
- Discourage spider mites by spraying plants with a strong stream of water.
- Apply neem oil or sulfur powder to deter fungal diseases like rust or powdery mildew.
- Improve air circulation and reduce watering to prevent mildew.
- Apply row covers or garden fabric to exclude pests.
With attentive care using organic techniques, you can keep asters healthy and thriving while eliminating pesticide use.
Harvesting Asters

One of the greatest rewards of growing asters is being able to harvest fresh-cut flowers to display in your home. Follow these tips:
- Use clean, sharp pruners or garden scissors/shears. Make cuts on a 45 degree angle.
- Harvest blooms once they are fully open in the cool morning hours.
- Cut stems 6-10 inches in length, removing any leaves that will be underwater.
- Immediately place stems in a vase filled with room temperature water and commercial flower preservative.
- Display arrangements out of direct sunlight and hot rooms to maximize longevity.
- Change the water and recut stem ends every 2-3 days. Use a clean vase each time.
Follow proper harvesting and post-harvest care and you’ll be able to enjoy your homegrown asters for over a week!
Troubleshooting Common Problems
Don’t be discouraged if challenges arise while growing asters. Here are some common issues and solutions:
Yellow or Wilting Leaves
Causes:
- Improper watering
- Poor drainage
- Nutrient deficiencies
- Root rot
- Insufficient sunlight
Solutions:
- Check soil moisture and water appropriately
- Amend soil to improve drainage
- Test and adjust soil pH
- Fertilize plants
- Move plants into full sun
Poor Flowering
Causes:
- Inadequate sunlight
- Improper pruning
- Overcrowding
- Excess nitrogen fertilizer
- Insufficient watering
- Pest or disease problems
Solutions:
- Increase sunlight exposure to 6+ hours per day
- Prune plants at the right time of year
- Thin plants and allow adequate spacing
- Use a balanced fertilizer
- Maintain even soil moisture
- Control pests and diseases promptly
Pest Infestation
Common asters pests:
- Aphids
- Spider mites
- Japanese beetles
- Slugs and snails
Solutions:
- Manually remove pests
- Use row covers as a barrier
- Spray insecticidal soap or neem oil
- Attract beneficial insects like ladybugs
- Remove debris and diseased material
- Improve air circulation
With attentive care, your asters will thrive season after season. Don’t hesitate to consult local garden centers if issues persist.
Tips for Asters Gardening Success

Follow these simple practices to support healthy, thriving asters:
- Choose resistant varieties – Select asters that are resistant to common diseases in your area. Ask at local garden centers for the best options.
- Plant at the proper time – Generally the best time is spring after the last frost date when soil temperatures warm.
- Space plants appropriately – Allow proper spacing for air circulation and growth. Taller varieties need 1-2 feet between plants.
- Provide support – Use stakes or trellises to support tall, floppy varieties prone to breakage.
- Site appropriately – Group asters in borders, beds, or containers where their late season color can shine.
- Fertilize – Feed every 4-6 weeks with a balanced fertilizer during the growing season.
- Prune regularly – Prune each spring and pinch back tips to promote bushy growth.
- Divide as needed – Congested clumps can be divided every 2-3 years. Replant divisions to rejuvenate.
- Mulch annually – Replenish mulch each spring, taking care not to pile it against stems.
- Check drainage – Periodically ensure proper drainage, amending soil as needed.
With the right care and preparation, growing asters is an extremely fulfilling and enjoyable gardening endeavor. A few simple practices will help ensure gardening success.
More Asters Gardening Tips
Here are some additional pointers to support a thriving asters garden:
Choosing Varieties
- Select compact varieties under 2 feet for containers. Taller varieties become floppy.
- Look for cultivars labeled “mildew resistant” if powdery mildew is an issue in your area.
- For pollinators, opt for single flower varieties like frikartii asters which have exposed centers bees prefer.
- Research bloom time. Plant early, mid, and late season varieties for ongoing color.
Companion Planting
- Pair asters with other late bloomers like chrysanthemums, sedums, goldenrod, and rudbeckia.
- Interplant with ornamental grasses. Their vertical shapes complement asters’ wide blossoms.
- Underplant asters with lower growing annuals like pansies, violas, or primrose.
- Grow with herbs like thyme, oregano, or parsley which repel certain pests.
propagation
Asters can be easily propagated by:
- Division – Congested clumps are divided in spring. Replant 12-18 inches apart.
- Cuttings – Take 3-6 inch cuttings in early summer. Dip in rooting hormone and plant in potting mix. Keep humid.
- Sowing seeds – Start seeds indoors 6-8 weeks before last frost. Barely cover seeds and keep moist. Harden off before transplanting outside.
Overwintering
- Leave plants stand over winter. Foliage insulates crown. Cut back once winter is over.
- In very cold regions, mulch with straw or leaves for added insulation. Avoid smothering.
- After a hard frost, cut asters back to 6 inches above the ground to prevent heavy snow damage.
Asters Varieties to Try

With over 600 species, there are countless varieties of asters to try. Here are some top recommendations:
New England Aster
- Hardy in zones 4-8
- Grows 3-6 feet tall
- Available in shades of purple, pink, red, white
- Blooms August – October
- Works well in borders or naturalized areas
Michaelmas Daisy
- Hardy in zones 4-8
- Grows 2-4 feet tall
- Flowers late summer to fall
- Blue, purple, pink blossoms
- Mildew resistant
- Attracts butterflies
China Aster
- Tender perennial, often grown as an annual
- 12-24 inches tall
- Blooms summer – fall
- Wide color range including bi-colors
- Require staking
- Ideal for containers
Alpine Aster
- Hardy in zones 3-7
- Compact at 4-10 inches tall
- Flowers spring to early summer
- Purple, pink, white blossoms
- Tolerates heat and humidity
- Good for edging paths or rock gardens
When to Plant Asters
Timing is an important consideration when planting asters:
- Spring: The optimal window is 4-6 weeks after the average last spring frost when soil warms. This gives asters time to establish before heat arrives.
- Summer: Established plants can be divided and replanted in early summer after bloom time. Keep watered.
- Fall: Planting in fall is not recommended since young plants need time to develop strong roots before winter dormancy.
Average Last Frost Dates
To determine the best spring planting time, consult your average local last frost date:
- Zone 3: May 1-15
- Zone 4: April 15-30
- Zone 5: April 1-15
- Zone 6: March 15-31
- Zone 7: Feb 15 – March 15
- Zone 8: January 15 – Feb 28
For example, if you are in zone 5 with an average last frost of April 10, you would ideally plant asters around May 15th.
Asters Gardening: A Rewarding Experience!
With their cheery daisy-like flowers in shades of purple, pink, red and white, asters are a beloved fall-blooming perennial. By selecting an appropriate site, amending the soil, and providing attentive care, growing asters can be an extremely rewarding gardening experience. Pay close attention to their cultural requirements for sunlight, drainage, and watering for the healthiest specimens. Learn to properly plant, fertilize, prune and troubleshoot problems. With the right approach, you’ll be able to cultivate thriving asters that provide years of enjoyment. Let your garden shine with the radiant colors of asters!