Growing daylilies at home can be a rewarding and fulfilling experience for any garden enthusiast. These beautiful and resilient flowers offer a stunning array of colors and blooms that can add a touch of elegance to your garden. In this comprehensive guide, we will take you through each step of the process, from choosing the right daylilies for your home garden to creating a blooming paradise. By following these tips and techniques, you can successfully cultivate daylilies and enjoy their beauty year after year.
To assist you on this journey, we will also address common questions and concerns that may arise along the way.
Whether you are a novice gardener or a seasoned pro, this guide is designed to provide you with the knowledge and confidence to create a stunning daylily garden in your own backyard. So, let’s get started on this delightful gardening adventure!
Choosing the Right Daylilies for Your Home Garden
When choosing the right daylilies for your home garden, it’s important to consider factors such as color, size, bloom time, and hardiness.
- Color: Select daylilies that complement your existing garden color scheme. Choices range from vibrant yellows and oranges to soft pastels and rich purples.
- Size: Consider the mature height and spread of the daylilies to ensure they will fit well within your garden space. Some varieties grow tall and upright, while others have a more compact or spreading habit.
- Bloom time: Choose daylilies with different bloom times to enjoy a continuous display of flowers throughout the growing season. Early, mid, and late-season varieties can be combined for a prolonged blooming period.
- Hardiness: Check the hardiness zone of the daylily variety and ensure it is suitable for your local climate. This will ensure the plants can withstand the temperature extremes in your area.
By considering these aspects, you can choose daylilies that will not only add beauty to your garden but also thrive in your specific growing conditions. Experiment with different combinations to create a visually appealing and diverse daylily display. Remember to provide proper care, including adequate sunlight, well-drained soil, and regular watering, to ensure the health and longevity of your daylilies.
Preparing the Soil for Daylilies
Preparing the soil for daylilies is an essential step in ensuring their successful growth and blooming. To prepare the soil:
- Start by selecting a location that receives a minimum of six hours of direct sunlight each day.
- Eradicate any weeds or grass from the area to provide a clean planting space.
- Loosen the soil to a depth of 12-18 inches using a garden fork or tiller. This will facilitate the daylilies in establishing their roots more easily.
- Add organic matter, such as compost or well-rotted manure, to enhance the soil’s drainage and fertility.
- Mix a balanced fertilizer into the soil, following the package instructions for application rates. This will provide vital nutrients for healthy growth.
- Assess the soil’s pH level using a soil testing kit. Daylilies prefer a slightly acidic to neutral pH range of 6.0-7.0. Adjust the pH if necessary using lime to raise it or sulfur to lower it.
- Thoroughly integrate the organic matter, fertilizer, and pH amendments into the soil using a garden rake.
- Evenly smooth the soil surface with the rake and create shallow trenches for planting the daylily bulbs or divisions.
- Carefully place the daylilies in the trenches, ensuring that the roots are spread out and covered with soil.
- Water the newly planted daylilies thoroughly to settle the soil.
- Maintain a consistent moisture level in the soil throughout the growing season, ensuring it does not become waterlogged.
- Apply a layer of organic mulch around the base of the plants to conserve moisture and suppress weed growth.
By following these steps, you can create a favorable environment for your daylilies to thrive and produce beautiful blooms.
Planting Daylilies in Your Garden
To successfully plant daylilies in your garden, you need to follow these steps:
- Plant daylilies in a suitable location. It should receive a minimum of 6 hours of sunlight per day. The soil should be well-draining, and there should be enough space for the plants to grow.
- Prepare the soil by removing any weeds, rocks, or debris. Make sure to loosen and aerate the soil using a garden fork.
- Dig a hole for each daylily plant. The hole should be wide and deep enough to accommodate the entire plant without crowding its roots.
- Place the daylily plant into the hole, ensuring that the crown of the plant is level with the surrounding soil.
- Backfill the hole with soil, gently patting it down to remove any air pockets around the roots.
- Thoroughly water the newly planted daylilies, ensuring that the soil is soaked to help settle it and provide moisture for the roots.
- Add a layer of mulch around the base of the plants. This will help retain moisture, suppress weed growth, and regulate soil temperature.
- Regularly water the daylilies, making sure the soil remains consistently moist but not waterlogged.
- Keep an eye out for any signs of pests or diseases on the plants. Take appropriate action if necessary to protect your daylilies.
- Enjoy the beautiful blooms of your daylilies all through the growing season!
By following these steps, you can successfully plant daylilies in your garden. Happy gardening!

Caring for Daylilies: Watering and Fertilizing
When it comes to caring for daylilies, proper watering and fertilizing are essential for their health and vitality.
- Watering: Daylilies require regular watering, especially during dry periods. Aim to provide about 1 inch of water per week, either through rainfall or manual watering. Avoid overwatering, as it can lead to root rot.
- Fertilizing: Feed your daylilies with a balanced fertilizer, such as a 10-10-10 or 14-14-14 formulation, in early spring when new growth appears. Apply the fertilizer according to package instructions, taking care not to over-fertilize, as it can burn the plants. Repeat the application in late summer to promote strong blooms.
Pro-tip: Mulching around the base of daylilies can help retain moisture in the soil and suppress weed growth. Use organic mulch, such as wood chips or leaf compost, to provide additional nutrients as it breaks down over time.
Controlling Pests and Diseases
Controlling pests and diseases is crucial for ensuring healthy daylilies in your garden. Here are some effective ways to manage pests and diseases:
- Inspect plants regularly: Regularly check your daylilies for any signs of pests or diseases. Look for discoloration, wilting, holes in leaves, or any unusual growth.
- Remove infected plants: If you notice any plants with signs of pests or diseases, remove them immediately to prevent the spread to other plants.
- Practice good garden hygiene: Keep your garden clean and free from weeds, fallen leaves, and debris. These can attract pests and serve as breeding grounds for diseases.
- Use organic pest control methods: Consider using natural predators, like ladybugs or nematodes, to control pests. You can also make homemade sprays using ingredients like neem oil or garlic to repel pests.
- Avoid overwatering: Overwatering can lead to fungal diseases. Ensure your daylilies receive adequate but not excessive water.
Throughout history, gardeners have battled pests and diseases to protect their beloved plants. From ancient farmers using natural remedies to modern advancements in pest control technology, the pursuit of healthy gardens has remained constant. Today, we continue to refine our methods and explore eco-friendly alternatives to keep our plants thriving. By staying vigilant and employing proper techniques, gardeners can effectively manage pests and diseases, ensuring beautiful and resilient daylilies for generations to come.
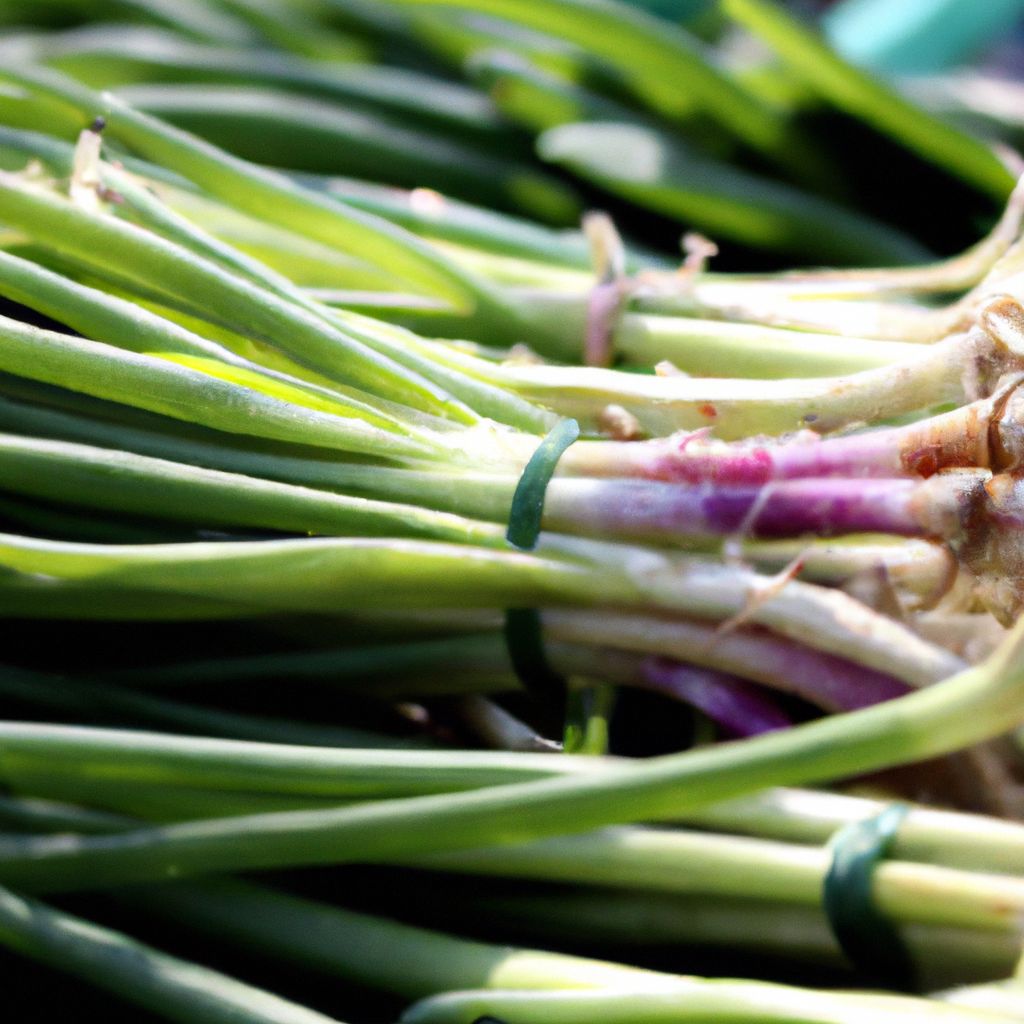
Dividing and Transplanting Daylilies
When it comes to dividing and transplanting daylilies, here are the steps to follow:
- Choose the right time: Dividing and transplanting daylilies is best done in early spring or late summer when the plant is not actively blooming.
- Prepare the soil: Ensure that the new location has well-draining soil with good organic matter.
- Water the daylilies: Before digging up the daylilies, water them thoroughly to reduce stress on the plants.
- Divide the clumps: Carefully dig up the daylilies and gently separate the clumps using your hands or a sharp knife.
- Trim the foliage and roots: Cut back the foliage to about 6 inches and trim any damaged or excessively long roots.
- Plant the divisions: Dig holes in the prepared soil that are large enough to accommodate the roots of each division. Place the divisions in the holes and cover the roots with soil.
- Water and mulch: Water the newly planted divisions thoroughly and apply a layer of mulch around the plants to conserve moisture and suppress weed growth.
Pro-tip: Dividing and transplanting daylilies every 3 to 5 years helps rejuvenate the plants and promote better blooming. It also allows you to propagate new plants to expand your daylily collection or share with fellow gardeners.
Pruning and Deadheading Daylilies
To ensure healthy growth and enhance blooming, it is crucial to incorporate proper pruning and deadheading techniques when it comes to daylilies. Follow these steps to effectively prune and deadhead your daylilies:
- Pruning: During early spring, it is important to remove any dead or damaged foliage by cutting it back to the base of the plant.
- Dividing: To prevent overcrowding, it is recommended to divide mature daylilies every 3-4 years. Dig up the clump and carefully separate the individual plants using a sharp knife. Afterward, replant the divisions in well-prepared soil.
- Trimming: After the first bloom cycle, it is advisable to trim the flower stalks down to the base of the plant in order to maintain a tidy appearance.
- Deadheading: To encourage the production of new blooms and prevent energy wastage on seed production, it is necessary to cut the stalks of spent flowers back to the base of the plant.
- Clean-up: Removing any debris or dead foliage around the daylilies is essential to prevent the spread of diseases and pests.
Daylilies have a rich history and have been cultivated for centuries. Originally brought to Europe from East Asia, the Chinese were the first to extensively cultivate daylilies for their edible buds and young shoots. In the early 20th century, hybridizers in the United States began creating new daylily varieties with a wide range of colors and forms. Today, daylilies are beloved garden plants known for their vibrant flowers and low maintenance.
Propagating Daylilies: Division and Seed Collection

When propagating daylilies, there are two main methods you can use: division and seed collection.
- Propagating Daylilies through Division: To propagate daylilies through division, follow these steps:
- Start by digging up the mature daylily clump using a garden fork or shovel.
- Separate the clump into smaller sections, ensuring that each section has healthy roots and sufficient foliage.
- Trim any damaged or dead roots and leaves.
- Replant each divided section into well-prepared soil, making sure to place them at the same depth as they were in the original clump.
- Water the newly planted divisions thoroughly to help them establish.
- Propagating Daylilies through Seed Collection: If you want to propagate daylilies from seeds, follow these steps:
- Allow the daylily flowers to bloom and produce seed pods.
- Wait until the seed pods turn brown and start to split open.
- Collect the mature seeds by gently opening the seed pods and removing the black, oval-shaped seeds.
- Store the seeds in a cool, dry place until you are ready to plant them.
- Sow the seeds in well-draining soil in early spring or fall and keep them moist until germination.
In the 19th century, daylilies were mainly grown for their medicinal properties. The roots of certain daylily species were believed to have healing properties and were used to treat various ailments. In modern times, daylilies have become popular ornamental plants prized for their attractive blooms and ability to thrive in a variety of climates.
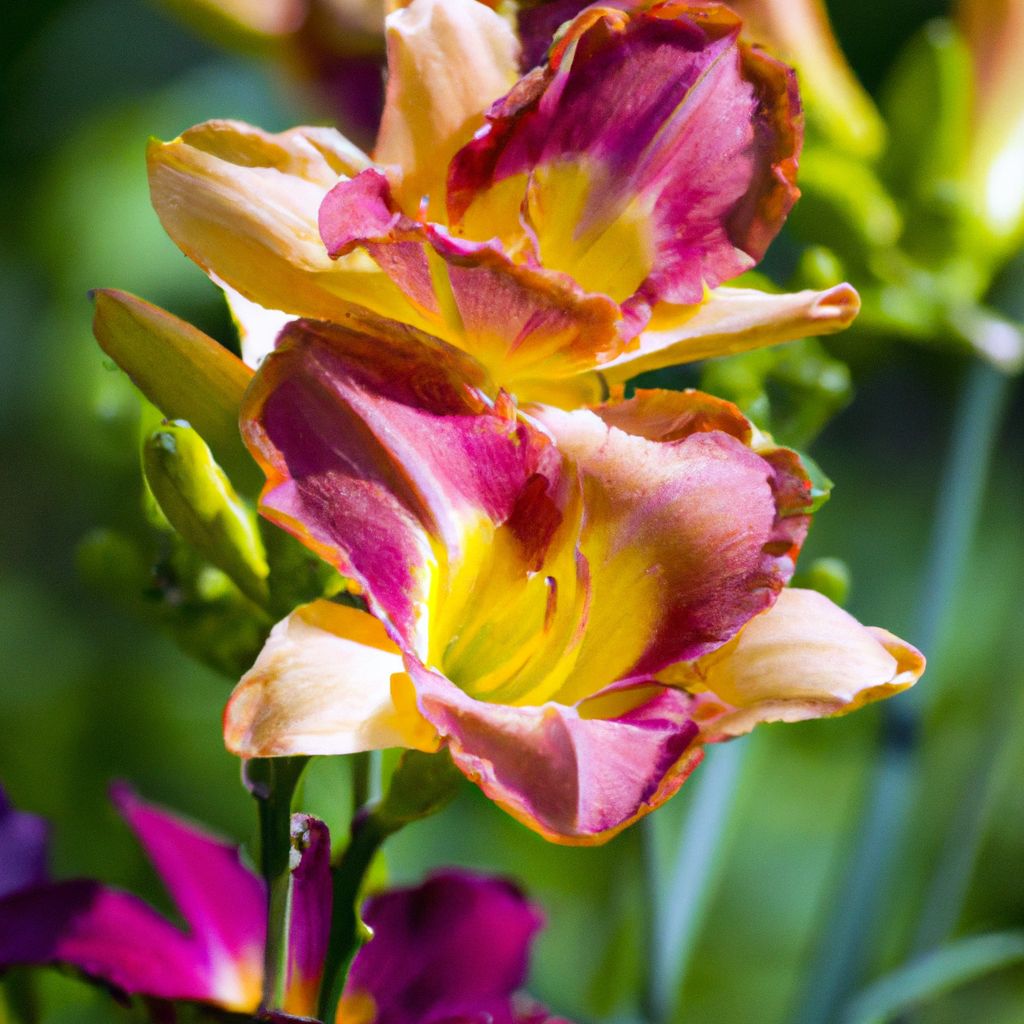
Enjoying the Blooms: Daylilies in Full Glory
Daylilies in full glory offer a truly delightful experience, allowing you to enjoy the blooms in all their splendor. The vibrant colors and intricate patterns of these stunning flowers can be truly mesmerizing, evoking a sense of wonder and appreciation for nature’s creations.
With their presence, daylilies can enhance the aesthetic appeal of your garden or backyard, adding a burst of lively colors. From vibrant oranges and reds to soft pinks and purples, these flowers create a visually stunning display that is sure to impress.
One of the joys of daylilies is their ability to produce multiple blooms, ensuring a continuous show of color throughout the blooming season. Each day, new flowers unfurl, adding to the overall charm and impact of daylilies in full glory.
Whether you choose to observe daylilies from a distance or take the time to appreciate their intricate details up close, their beauty is a sight to behold. The delicate petals, intricate patterns, and sweet fragrance all contribute to the enjoyment of these magnificent flowers.
So, take a moment to bask in the wonder of daylilies in full glory. Immerse yourself in their beauty, appreciate their presence, and embrace the joy they bring to your surroundings.
Harvesting and Using Daylily Flowers
When it comes to harvesting and using daylily flowers, the process is quite simple. Not only does it allow you to appreciate their stunning beauty, but also their delightful flavors. Follow these steps to make the most of your daylilies:
- Choose the right time: Harvest daylily flowers when they are fully open for the best flavor and appearance.
- Use clean tools: Before harvesting, make sure your scissors or knife are clean to prevent any potential contaminants.
- Cut the flowers: Remove the daylily flower by cutting the stem close to the base of the plant.
- Prepare for consumption: Rinse the flowers gently under cool water to remove any dirt or debris.
- Use in culinary creations: Daylily flowers can be used fresh in salads, soups, stir-fries, or as a colorful garnish.
- Dry for future use: If you want to preserve the daylilies, you can dry them by hanging them upside down in a dry and well-ventilated area. Once dried, store them in an airtight container.
Now that you have learned how to harvest and use daylily flowers, let your culinary creativity soar. Explore various dishes and flavors to fully savor these beautiful and versatile blooms.
Common Problems and Troubleshooting
- Yellowing leaves: Common Problems and Troubleshooting – This is often a sign of overwatering or nutrient deficiencies. Check the soil moisture levels and adjust watering accordingly. Consider using a balanced fertilizer to provide the necessary nutrients.
- Lack of blooms: Common Problems and Troubleshooting – Insufficient sunlight or overcrowding can result in a lack of blooms. Make sure the daylilies are getting at least 6 hours of direct sunlight and thin out crowded areas to promote better airflow.
- Pests and diseases: Common Problems and Troubleshooting – Common pests include aphids and spider mites. Use insecticidal soap or neem oil to control these pests. Diseases such as crown rot and leaf streak can be prevented by practicing good sanitation and avoiding overwatering.
- Weed competition: Common Problems and Troubleshooting – Weeds can compete with daylilies for nutrients and water. Regularly remove weeds from the planting area and consider using mulch to suppress weed growth.
- Improper division: Common Problems and Troubleshooting – Overcrowded daylilies may need to be divided to rejuvenate growth. Dig up the clumps and separate the individual plants, making sure each division has sufficient roots and foliage before replanting.
Did you know? Daylilies are not true lilies! They belong to the Hemerocallis genus and are known for their vibrant blooms that last only a day.
What Are the Different Types of Daylilies?
The different types of daylilies can add variety and beauty to your garden. What Are the Different Types of Daylilies to consider?
- Double daylilies: These daylilies have double petals, giving them a fuller, more ruffled appearance.
- Tetraploid daylilies: These daylilies have four sets of chromosomes, resulting in larger and more robust flowers.
- Spider daylilies: Spider daylilies have long, thin petals that resemble spider legs, adding an interesting and unique look to your garden.
- Miniature daylilies: As the name suggests, miniature daylilies have smaller flowers, making them ideal for smaller gardens or containers.
- Reblooming daylilies: Reblooming daylilies produce flowers multiple times throughout the season, extending the blooming period in your garden.
- Unusual form daylilies: These daylilies have unique petal shapes, such as pinched, twisted, or curled petals, adding intrigue and elegance to your garden.

True story: When I planted a variety of daylilies in my garden, I was amazed at the vibrant colors and different forms they brought to the space. The double daylilies added a touch of luxury, while the spider daylilies created a whimsical atmosphere. The reblooming daylilies ensured that my garden was constantly filled with beautiful blooms throughout the season. With the different types of daylilies, my garden became a haven of color and diversity, attracting butterflies and bees. It was a joy to see the different types of daylilies coming to life and creating a stunning display in my backyard.
How Many Daylilies Should I Plant?
When deciding how many daylilies to plant in your garden, consider factors such as available space, overall garden design, desired visual impact, and the question of “How Many Daylilies Should I Plant?”.
- Space: Take into account the size of your garden beds and the amount of space each daylily requires. Generally, daylilies should be spaced about 12 to 18 inches apart to allow for healthy growth and airflow.
- Garden Design: Consider the overall aesthetic you want to achieve in your garden. If you prefer a more compact and structured look, planting fewer daylilies might be ideal. Alternatively, if you want a bold and vibrant display, planting more daylilies can create a stunning effect.
- Visual Impact: Think about the impact you want your daylilies to have. If you want them to be a focal point in your garden, planting a larger number of daylilies can make a stronger visual statement. On the other hand, if you want to complement other flowers or foliage, a smaller number of daylilies may be sufficient.
Ultimately, the number of daylilies you should plant depends on your personal preferences and the specific characteristics of your garden. Consider these factors and the question of “How Many Daylilies Should I Plant?” when making your decision, and remember that you can always add or remove daylilies in the future to adjust the overall look of your garden.
When and How Should I Plant Daylilies?
When and How Should I Plant Daylilies?
- Choose a suitable location for planting daylilies. They thrive in full sun or partial shade.
- To plant daylilies, start by preparing the soil. Remove any weeds and loosen it with a garden fork or tiller.
- If necessary, amend the soil by adding organic matter such as compost or well-rotted manure. Mix it well with the existing soil.
- Dig a hole for each daylily, making sure it is wide and deep enough for the root system.
- Place the daylily in the hole, ensuring that the crown is level with or slightly above the soil surface.
- Backfill the hole with soil, gently firming it around the plant to remove any air pockets.
- After planting, water the daylily thoroughly to help settle the soil and establish proper root growth.
- Apply a layer of mulch around the base of the plant to conserve moisture and prevent weed growth.
- Regularly water the daylilies, especially during dry periods, to maintain consistent soil moisture without overwatering.
- For nutritional needs, fertilize the daylilies once or twice a year using a balanced fertilizer according to package instructions.
By following these steps, you can successfully plant daylilies and enjoy their beautiful blooms in your garden.
What Are the Basic Care Tips for Growing Daylilies at Home?
What Are the Basic Care Tips for Growing Daylilies at Home? When it comes to growing daylilies at home, there are some basic care tips that you should keep in mind. Here is a list of important considerations:
- Location: Choose a sunny spot in your garden for planting daylilies.
- Soil: Ensure that the soil is well-drained and rich in organic matter.
- Watering: Daylilies require regular watering, especially during hot and dry periods.
- Fertilizing: Apply a balanced fertilizer in early spring and then again after the plants have finished blooming.
- Mulching: Mulch around the plants to help conserve moisture and suppress weed growth.
- Deadheading: Remove spent flowers to encourage continuous blooming.
- Division: Divide overcrowded clumps every few years to maintain plant health and promote more blooms.
- Pest and disease control: Monitor your plants for signs of pests or diseases and take appropriate action if needed.
- Winter protection: In colder climates, consider protecting your daylilies with a layer of mulch during winter.
By following these basic care tips, you can ensure that your daylilies thrive and reward you with beautiful blooms year after year.

How Can I Prevent Pests and Diseases in My Daylily Garden?
To prevent pests and diseases in your daylily garden, there are several effective strategies you can employ. Firstly, ensure that you maintain good garden hygiene by regularly removing any dead leaves, stems, or spent flowers, as these can attract pests and provide a breeding ground for diseases. Additionally, avoid overcrowding your daylilies by providing adequate spacing between plants, as this can reduce the risk of diseases spreading.
Implementing mulch around your daylilies can help to suppress weeds and retain moisture in the soil, which promotes plant health and reduces the risk of diseases. Additionally, consider using organic insecticides or repellents to control common pests such as aphids, slugs, and snails. Be sure to follow the instructions provided by the manufacturer for safe and effective application.
Inspect your daylilies regularly for any signs of pests or diseases, such as discolored leaves, wilting, or unusual growth patterns. Early detection can help prevent the spread and severity of issues. Should you identify any problems, promptly remove and dispose of infected plant material to prevent further contamination.
By following these proactive measures, you can significantly reduce the risk of pests and diseases in your daylily garden, allowing your plants to thrive and bloom beautifully.
Fact: Did you know that daylilies are known for their ability to attract butterflies and hummingbirds with their vibrant flowers and sweet nectar?
When Should I Divide and Transplant Daylilies?
To determine when you should divide and transplant daylilies, follow these steps:
1. Observe the growth of your daylilies. Dividing and transplanting should be done when the plants have become overcrowded or when they have stopped blooming as abundantly as before.
2. Check the time of year. The best time to divide and transplant daylilies is in early spring or late summer. These periods provide the ideal conditions for the plants to establish new roots.
3. Choose a cool and cloudy day for the process. This will minimize stress on the plants and help them adjust to their new location more easily.
4. Prepare the new planting site. Ensure that the soil is well-drained and enriched with organic matter to promote healthy growth.
5. Carefully dig up the clumps of daylilies using a garden fork or spade. Gently separate the clumps into individual plants, making sure each division has healthy roots and foliage.
6. Trim back the foliage to about six inches to reduce water loss and encourage new growth.
7. Plant the divided daylilies at the same depth they were previously planted. Space them adequately to allow for proper air circulation and future growth.
8. Water the transplanted daylilies thoroughly to help settle the soil and promote root development.
9. Mulch around the base of the plants to conserve moisture and suppress weed growth.
10. Maintain regular watering and provide adequate fertilization as the transplanted daylilies establish themselves in their new location.
By following these steps, you can ensure that your divided and transplanted daylilies have the best chance for success and continued beautiful blooms.
How Do I Prune and Deadhead Daylilies Properly?
When it comes to pruning and deadheading daylilies properly, many people often wonder, “How do I prune and deadhead daylilies properly?” Well, here are the steps you should follow to ensure healthy growth and beautiful blooms:
- Start by identifying the spent blooms on your daylilies. These are the flowers that have faded and wilted.
- Using clean and sharp pruning shears or scissors, carefully cut the faded blooms as close to the stem as possible.
- Remove any leaves or foliage that are yellowed or damaged. This will greatly help in improving the overall appearance of the plants.
- While doing this, be very careful not to cut any healthy buds or new growth that may be emerging from the plant.
- Dispose of the removed blooms and foliage properly, either by composting or discarding them in the appropriate waste bin.
- After completing the pruning and deadheading process, it is crucial to water the daylilies thoroughly. This will promote new growth.
- Make sure to monitor your plants regularly and repeat the pruning and deadheading process as needed throughout the blooming season.
To further enhance the health and appearance of your daylilies, here are some additional suggestions you can consider:
- Apply a balanced fertilizer according to the recommended guidelines for your specific daylily variety.
- Maintain a regular watering schedule to keep the soil moist but not overly saturated.
- Keep the area around the daylilies free from weeds and debris. This will minimize competition for nutrients.
- Regularly monitor for any signs of pests or diseases and take prompt action to control and prevent them.
- Another valuable approach is dividing your daylilies every few years. This helps promote rejuvenation and prevents overcrowding.
What Are the Best Methods for Propagating Daylilies?
Propagation is an important aspect of growing daylilies at home. What Are the Best Methods for Propagating Daylilies? Here are the best methods for propagating daylilies:
- Division: Dividing daylilies is the most common and effective method of propagation. In early spring or fall, carefully dig up the clump of daylilies and separate the individual fans or groups of fans. Each division should have healthy roots and at least three to five fans. Replant the divisions at the same depth as before, spacing them apart to allow room for growth.
- Offsets: Daylilies produce offsets or small plants around the base of the main clump. These offsets can be gently removed and planted separately. Make sure each offset has its own set of roots and fans before transplanting.
- Tissue Culture: For mass propagation, tissue culture is a reliable method. Tissue culture involves taking tiny samples of the daylily plant and growing them in a controlled laboratory environment. This method allows for the production of large numbers of genetically identical plants.
- Seeds: While not as commonly used as division or offsets, propagating daylilies from seeds is another option. Collect ripe seeds from spent flower pods and sow them in a well-prepared seedbed. Germination may take several weeks, and it may take a few years for the seedlings to mature and bloom.
Remember to choose the method that best suits your needs and preferences. Each method has its own advantages and considerations. For example, division is quick and results in mature plants faster, while seeds require patience but offer the opportunity for new and unique varieties.
Pro-tip: It’s important to maintain the health and vitality of the mother plants to ensure successful propagation. Regular feeding, watering, and proper care will boost the overall success rate of propagating daylilies.

What Are Some Tips for Maximizing Blooms in my Daylily Garden?
When it comes to maximizing blooms in your daylily garden, here are some tips to keep in mind:
- Choose the right location: Daylilies thrive in full sun, so make sure to plant them in an area that receives at least 6 hours of sunlight per day.
- Prepare the soil: Before planting, ensure that the soil is well-draining and rich in organic matter. Add compost or aged manure to improve soil fertility.
- Plant at the right time: Daylilies should be planted in early spring or early fall to give them enough time to establish their roots before the hot summer or cold winter months.
- Proper watering: Water your daylilies consistently, keeping the soil moist but not waterlogged. Deep watering once a week is usually sufficient, but adjust based on rainfall and temperature.
- Fertilize appropriately: Apply a balanced fertilizer, such as a 10-10-10 or 14-14-14, in early spring and mid-summer to provide the necessary nutrients for healthy growth and abundant blooms.
- Deadhead spent blooms: Removing faded flowers promotes continuous blooming and prevents the plant from diverting energy into seed production.
- Divide regularly: Over time, daylilies can become crowded, leading to reduced blooms. Divide the clumps every 3-4 years to rejuvenate the plants and encourage more flowers.
- Control pests and diseases: Monitor your daylilies for common pests like aphids or spider mites, and promptly take action if an infestation occurs. Additionally, remove any diseased leaves to prevent the spread of diseases.
- Mulch for moisture retention: Apply a layer of organic mulch around your daylilies to help retain moisture in the soil and suppress weed growth.
- Provide support if needed: Some daylily varieties have tall flower stalks that may require staking to prevent them from bending or toppling over.
Following these tips, you can maximize the blooms in your daylily garden and enjoy a stunning display of flowers.
How Can I Harvest and Use Daylily Flowers?
Wondering how can you harvest and use daylily flowers? Here’s a step-by-step guide:
- Look for fully opened blooms with vibrant colors to identify the flowers ready for harvest.
- Get a pair of clean, sharp garden scissors or shears to prepare for cutting the flowers.
- Choose the freshest time of day for harvesting, usually in the morning or evening.
- Hold the stem of the daylily flower gently and make a clean cut just above the leaves or foliage.
- Ensure you collect the harvested flowers in a clean basket or container to preserve their quality.
- To remove any dirt or debris, rinse the flowers under cool running water.
- Inspect the flowers for pests or damage and remove unsuitable blooms.
- Based on your preferences and creative ideas, decide how to use the daylily flowers.
- Add them as edible decorations in salads, soups, or stir-fries for common culinary uses.
- Create beautiful floral arrangements by combining the daylilies with compatible flowers.
- Store any unused daylily flowers in a sealed container or plastic bag in the refrigerator to maintain freshness for up to a week.
By following these steps, you can easily harvest and make the most of your daylily flowers.
What Are Some Common Problems Faced When Growing Daylilies and How to Solve Them?
When growing daylilies, there are common problems that gardeners may encounter. Here is a list of those problems and how to solve them:
- Pest infestation: Aphids and spider mites can be a nuisance on daylilies. To combat them, regularly inspect the plants and remove any affected leaves or flowers. A strong blast of water can help to dislodge the pests. In severe cases, neem oil or insecticidal soap can be used.
- Fungal diseases: Daylilies are susceptible to diseases like leaf spot and crown rot. To prevent fungal infections, ensure proper spacing between plants to promote good air circulation. Remove any infected leaves or blooms immediately. Applying a fungicide can also help in controlling the spread of fungal diseases.
- Poor blooming: If your daylilies are not blooming well, it could be due to insufficient sunlight or inadequate fertilization. Daylilies require at least 6 hours of direct sunlight to thrive. Ensure you are providing them with enough sunlight. Additionally, fertilize the plants with a balanced fertilizer high in phosphorus, which promotes flowering.
- Overcrowding: Over time, daylilies can become overcrowded, leading to reduced blooming and increased susceptibility to diseases. To solve this, divide the clumps every 3 to 4 years. Dig up the entire clump and separate the individual plants. Replant them with adequate spacing.
- Improper watering: Daylilies prefer consistently moist soil, but they don’t like to sit in wet conditions. Overwatering can lead to root rot, while underwatering can cause the plants to become stressed. Water the plants deeply but infrequently, allowing the top inch of soil to dry out between waterings.
By addressing these common problems, you can ensure your daylilies grow healthy and vibrant in your garden.
Frequently Asked Questions
Can daylilies be grown in partial sun?
Answer: Yes, daylilies can be grown in partial sun. They prefer full sun, but they can tolerate some shade. However, they will bloom best with at least six hours of direct sunlight per day.
What are the recommended zones for growing daylilies?
Answer: Daylilies can be grown in zones 3 to 9. They are hardy perennials that can thrive in a wide range of climates.
Are there compact varieties of daylilies available?
Answer: Yes, there are compact varieties of daylilies available. These varieties are smaller in size and are well-suited for smaller gardens or containers.
How can I keep deer away from my daylilies?
Answer: To keep deer away from your daylilies, you can use Tomcat Deer Repellent spray. This will help deter deer from eating the plants and damaging your garden.
What are some flower bed ideas that include daylilies?
Answer: Daylilies can be used to create a tapestry of color in flower beds. They pair well with ornamental grasses, hydrangeas, rudbeckia, and other summer perennials for a vibrant and dynamic display.
What products are recommended for planting and caring for daylilies?
Answer: Miracle-Gro Garden Soil for Flowers is recommended for preparing the soil before planting daylilies. Miracle-Gro Shake ‘n Feed Rose & Bloom Plant Food is recommended for regular feeding of daylilies during the growing season. Both of these gardening products can help ensure healthy growth and abundant blooms in daylilies.