


Violets have captivated gardeners and floral enthusiasts for centuries with their delicate beauty and sweet fragrance. Beyond ornamental appeal, many types of violets also offer the bonus of having edible flowers and leaves that can elevate recipes with their mild yet elegant flavor. For the home gardener interested in trying their hand at growing violets, whether for visual interest or the ability to harvest fresh flowers and greens straight from their backyard, learning key aspects of successful violet cultivation is essential. From proper site preparation to suitable varieties, and tips for sowing seeds or dividing plants, this guide will uncover the fundamentals behind thriving violet gardens. Let’s explore why violets are so alluring to cultivate and how you too can surround yourself with their vibrant blossoms!
Selecting the Right Violet Variety
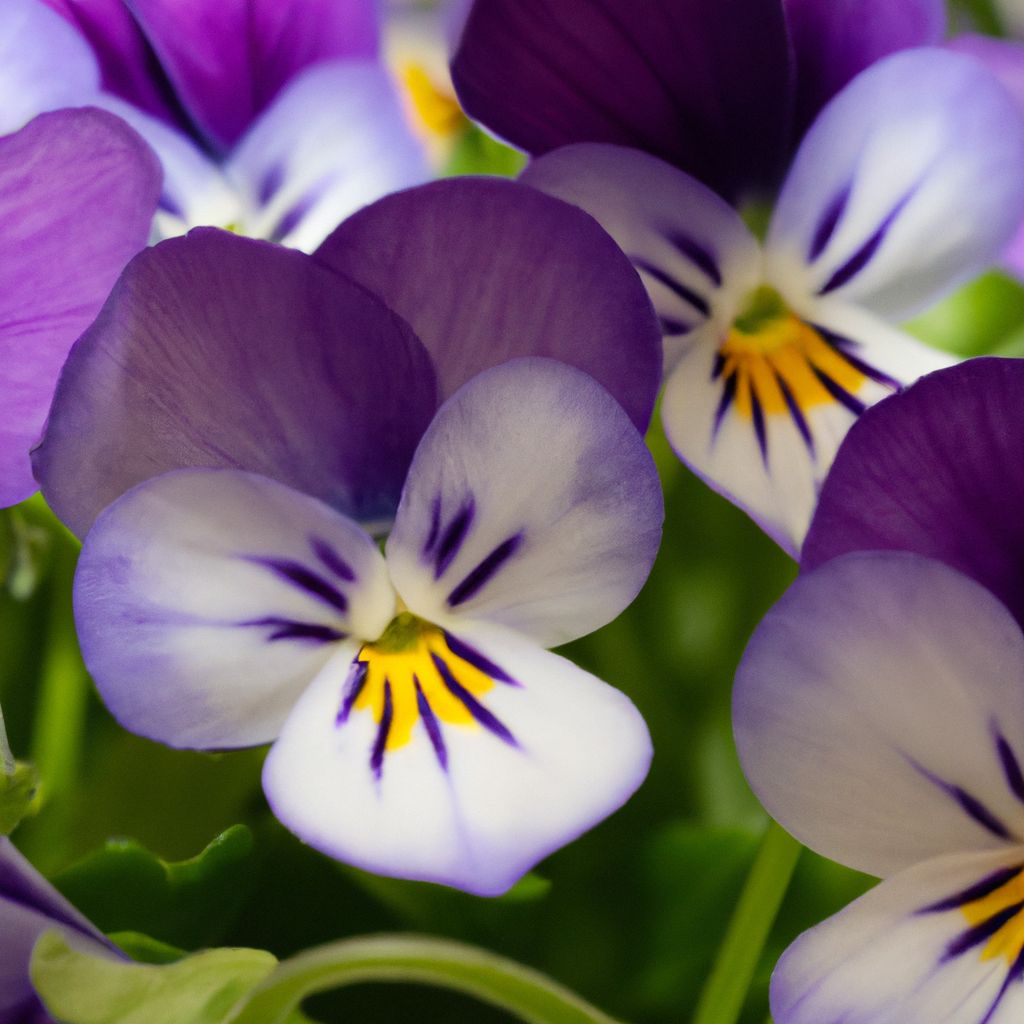
When embarking on violet cultivation, the possibilities abound regarding the vibrancy of colors, growth habits, bloom times and forms to consider. Here are profiles of some of the most popular violet varieties to help match the perfect bloom to your landscape vision and uses.
Common Violet
The Common Violet (Viola odorata) produces sweetly fragrant purple, blue, pink or white blooms during the spring season. This classic violet variety features:
- Heart-shaped, dark green leaves
- Compact form, reaching 4-8 inches tall
- Fragrant flowers in shades of purple, blue, white or pink that emerge in springtime
- Attracts beneficial pollinators like bees and butterflies
With partial shade and moist, well-drained soil, the Common Violet thrives in both garden beds and containers. Its edible flowers work well for teas, candies, desserts, and culinary garnishes. Delicately fragrant with a sweet floral taste, they can elevate the flavors of salads, beverages, vinegars, syrups, and more.
Parma Violet
Parma Violets (Viola × wittrockiana) showcase abundant blooms in vibrant shades of purple from March to May. These Violets reach up to 6 inches tall and prefer sandy, well-drained soil and partial shade. Throughout history, the sweetly scented flowers have been used in perfumes and to garnish desserts. Key traits include:
- Large, showy flowers in colors like purple, violet, cream
- Heart-shaped leaves with scalloped edges
- Height up to 6 inches
- Blooms from March to May
The edible Parma Violet flowers make excellent cake decorations. Their slightly perfumed flavor also enhances sweets like candies, ice creams, and beverages ranging from tea to cocktails.
Sweet Violet
Sweet Violets (Viola odorata) produce delicate purple and blue blooms with a delightful, sweet fragrance. Reaching 6 to 8 inches tall, they thrive in partial sun to full shade and moist, fertile soil conditions. Other key details:
- Purple-blue blooms with sweet floral fragrance
- Heart-shaped, dark green leaves
- Height range from 6 to 8 inches
- Partial sun to full shade location
- Consistently moist, fertile soil
Both the petite flowers and heart-shaped leaves of Sweet Violets are edible, making them very versatile. The colorful blooms elegantly garnish desserts and fruit dishes while the leaves lend pleasant, mild flavor to soups, stews, salads and more.

Preparing Optimal Violet Soil
One of the keys to successfully growing lush, floriferous violet plants lies hidden below the surface in the soil. Most violets thrive best in neutral to slightly acidic soil, with excellent drainage and abundant organic matter to retain moisture and nutrients. Here are the most vital aspects to focus on when prepping your planting beds:
Soil Type and pH
- Well-draining, loamy or sandy soil enriched with organic matter provides an ideal foundation
- Test and amend soil pH to fall between 6.0-7.0
- Incorporate pH adjusters several weeks before planting
Organic Amendments
- Compost, well-rotted manure, worm castings boost fertility
- Coconut coir, peat, or compost improves moisture retention
- Avoid over-amending heavy, poorly draining soils
Mycorrhizae
- Beneficial symbiotic soil fungi
- Enhance nutrient and water uptake efficiency
- Sprinkle spores into planting holes when transplanting
With proper soil preparation complete, violet roots can more easily drive down and plants will be better poised to thrive.

Propagating Violets
Violets can be grown from seed, plant division or cuttings with proper care and attention. For home growers, starting with young nursery plants or dividing existing clumps may be the most successful approach. But venturesome gardeners can certainly try their hand at propagating violets from seed or cuttings using the following methods.
Starting Violets from Seed
Growing violets from seeds allows you to explore more diverse varieties. To start violet seeds:
- Fill sterile seed starting mix in containers with drainage holes
- Barely cover seeds with thin layer of fine vermiculite
- Maintain 70-75°F temperature
- Keep soil consistently moist but not saturated
Once seedlings develop 2-3 true leaves, transplant into larger containers or garden beds. Gradually acclimate them to outdoor conditions. With attentive care while maturing, vibrant violet flowers will blossom the following spring.
Dividing Established Violet Plants
Mature, healthy violet clumps can be divided every 2-3 years, ideally in early spring or fall before flowering. Here is a step-by-step guide:
- Water violet plants 1-2 days prior to dividing
- Carefully dig up entire clump with roots intact
- Gently shake or hose off excess soil
- Divide root mass into sections with roots and foliage
- Prepare planting bed with rich soil
- Replant divisions 12-15 inches apart
- Water thoroughly after planting
Dividing overgrown clumps rejuvenates plants, controls spread, and generates more violets for free! Remove spent blooms the first year to direct energy into root growth instead of flowering.
Taking Stem Cuttings
Here is the process for trying to root violet stem cuttings:
- Use a sharp knife or pruners to take 3-5 inch cuttings
- Cut just below a leaf node
- Strip lower leaves and dip cut end in rooting hormone
- Stick into sterile soilless mix
- Cover lightly with plastic to retain moisture
- Keep consistently moist and warm (~70°F)
- Monitor for rooting after 4-6 weeks
Rooting success rates can be unpredictable. For best results, take cuttings from young, vigorously growing stems in the morning. Newly rooted plants may take a full year to reach blooming size when grown from cuttings.

Caring for Violets Through the Seasons
Caring properly for violet plants ensures they thrive for years of beauty and bountiful harvests. Essential care aspects include:
Sunlight, Temperature and Exposure
Most violets grow best with:
- 4-6 hours of sun, avoiding intense afternoon rays
- Consistently cool 60-70°F temperatures
- Protection from frost and winter extremes
- Air circulation and spacing to prevent fungal issues
Greenhouses, cold frames, and shade structures help regulate light and temperatures for optimum growth and flowering.
Water and Soil Moisture
- Provide 1 inch of water per week
- Water thoroughly at soil level to keep foliage dry
- Allow soil to partially dry between waterings
- Use mulch to cool roots and conserve moisture
Well-prepared, loamy soil with sufficient drainage is critical to avoid soggy conditions leading to rot and disease.
Addressing Nutrient Needs
- Incorporate slow-release organic fertilizer at planting
- Top dress containers with worm castings or compost tea
- Meet micronutrients needs with seaweed extracts
- Avoid excessive nitrogen which causes lanky growth
With supportive feeding and optimal soil biology, violet plants can access the essential nutrients their sought-after blooms demand.
Pruning and Deadheading
- Remove spent blooms to prolong flowering
- Prune leggy stems back to a leaf node
- Cut out dead or damaged leaves/stems
- Keep foliage dry and allow for airflow
Consistent grooming keeps plants looking tidy, supports regeneration of new growth, and wards off the spread of fungal diseases.

Dealing With Violet Pests and Diseases
While violets have relatively few serious pest and disease threats compared to other flowering plants, their preferred cool and moisture-rich growing conditions can sometimes entice fungal or bacterial troubles. Being able to recognize the signs of infections early allows for quicker remedial action. Potential violet problems include:
Common Violet Insect Pests
Spider Mites
- Tiny spiders that suck nutrients from leaves
- Webbing may be visible on close inspection
- Knock off with strong spray of water
- Apply insecticidal soap if needed
Slugs & Snails
- Chew holes in leaves and petals
- Hand pick at night when active
- Trap in small containers of beer
- Deter with diatomaceous earth
For minor pest infestations, natural remedies like insecticidal soaps or horticultural oils are often sufficient to get the upper hand. Ensure overall plant health with good cultural practices to help violets resist and recover.
Preventing Violet Diseases
Violets are generally hardy, disease-resistant plants, but may occasionally suffer from the following fungal or bacterial infections under suboptimal growing conditions:
Powdery Mildew
- White fungal coating on leaves/stems
- Improve air circulation
Downy Mildew
- Yellow leaf spots, gray underside mold
- Avoid overhead watering
Root Rot
- Caused by overwatering
- Roots turn brown and mushy
- Improve soil drainage
Bacterial Leaf Spot
- Small, brown, water-soaked spots on leaves
- Dark edges surround spots
- Practice preventive measures
The best offense is a good defense when it comes to violet diseases. Ensuring good air flow, proper spacing, crop rotation, and following ideal cultural practices reduces incidence. Routinely inspect plants and quickly address emerging issues before they intensify. Remove and destroy severely infected plants.

Harvesting and Preserving Violets
Once established, violet plants will reward careful tending with an abundant supply of vivid blooms for cutting and foliage for seasoning home cuisine. Knowing optimal harvest times and proper post-harvest handling allows their delicate beauty to be enjoyed to the fullest.
Harvesting Cut Flowers
For the best vase life of cut flower stems:
- Harvest flower stems once buds start to open
- Make early morning cuts when well-hydrated
- Immediately plunge into water after cutting
Post-Harvest Care
- Use commercial flower preservative
- Recut stems and replace vase water
- Display arrangements away from direct light
Harvesting Edible Flowers and Greens
Both violet flowers and leaves offer edible bounty. Ideal harvest methods include:
Edible Flowers
- Use scissors to gently cut open blooms
- Rinse carefully and check for insects
- Use as plate garnishes or frozen in ice cubes
Leaves
- Pick young, tender leaves for salads
- Sautee or add older leaves to cooked dishes
Other Parts
- Dig roots in fall to use like burdock
- Harvest self-sown seed pods
Get creative with violets in making floral infused honey, syrups, vinegars, buttercreams, and preserves. Their versatility lends well to experimentation!
Preserving Violets
To enjoy their beauty year-round try:
- Air drying whole stems upside down in a dark, dry area
- Pressing flowers between layers of absorbent paper
- Freezing flower ice cubes for future beverages
- Follow recipes for crystallizing blooms
With so many possibilities for highlighting violets’ delicate charm in the home landscape and on the dinner plate, cultivating these multifaceted plants promises to be a thoroughly rewarding and sensory-pleasing endeavor!

The Enduring Allure of Violets
For flower lovers and locavore gardeners alike, violets offer a versatility spanning visual elegance, sweet fragrance, and edible abundance. Despite delicate appearances, with proper variety selection for your growing conditions and attentive care through the seasons, vivid violets can flourish for years as a garden highlight. There’s no denying these plants have captivated people’s affection across cultures and eras with their beauty, aroma, and flavors. By learning the fundamentals behind successfully cultivating violets, you too can surround yourself with their vibrant hues and enjoy their many charms fresh from your own backyard. Give violet gardening a try this season – their allure promises to delight the senses as you sow and savor!
Frequently Asked Questions About Violet Cultivation
Growing luscious violets may seem daunting to the beginner, but just a bit of background knowledge can clear up most uncertainties. Here are answers to some of the top beginner questions about successfully cultivating violets:
Can violets grow well in containers?
Yes! Violets adapt beautifully to container life. Choose pots about 6-10 inches wide with drainage holes. Use a quality potting mix and situate containers in locations matching the variety’s light and moisture needs. Container plantings offer the ability to better control growing conditions. Shelter pots from intense sun and wind which can rapidly dry them out.
What are the best uses for Parma violets?
Parma violets showcase excellent vase life as cut flowers and their large, vivid blooms make festive cake decorations. The edible flowers also lend sweet flavor for candying, infusing into beverages, and garnishing desserts. Their versatility matches their vivid beauty!
How do I control violets from spreading rapidly?
To curtail violets from aggressive spreading via self-seeding or root expansion, refrain from allowing spent blooms to form seed pods. Deadhead routinely. For isolated planting beds, sink a 6 inch tall metal flashing border down around the perimeter to contain underground rhizome growth. Outside of containment areas, simply pluck out unwanted spreaders.
When is the best time to transplant violets?
Early spring or fall is ideal for transplanting container-grown violets to the garden. Their active growth periods allow young roots to establish more rapidly. Water transplants attentively until fully settled. You can also propagate new starts by dividing overgrown violet clumps during these periods.
Should leaves touching the ground be removed?
Allowing violet leaves to remain touching the ground generally will not harm healthy plants. In fact, the lower leaves often shelter emerging blooms. However, trim away foliage that yellows or dies to discourage diseases and improve air movement. Keep an eye that heavy leaf cover doesn’t overly obscure emerging buds.
How often do violets need fertilizing?
Violets are light feeders but do appreciate occasional nutritional boosts during the growing season. Every 4-6 weeks, scratch 1 tablespoon of balanced organic granular fertilizer lightly into the soil around each plant. For containers, you can apply half-strength liquid fertilizer monthly. Excess feeding encourages floppy growth prone to disease.
Can other plants grow well with violets?
Many spring-blooming bulbs like crocuses, grape hyacinths, and mini daffodils beautifully combine with violets in the garden for a showy flower carpet. Variegated ground cover plants such as lemon thyme or creeping phlox also help violets stand out. Dahlias, astilbes, coral bells offer nice vertical contrast and succession of summer blooms after violets fade.
What causes holes in the leaves of my violets?
Small holes chewed into violet foliage are typically caused by slugs and snails feeding at night. Set out small dishes of beer near plants to attract and trap these nocturnal pests. Crushed eggshells or diatomaceous earth sprinkled around the perimeter also helps deter their approach. Be sure to eliminate daytime hiding spots like piles of debris.
Should I cut back violets in fall?
As summer wanes, violet plants naturally enter dormancy. Prune back foliage by 1/3 and cut away any dead basal leaves to reduce overwintering disease issues. Apply fresh mulch around the crown before winter but avoid premature spring removal which can expose plants to late frosts before sufficient new growth emerges.
Why won’t my violets bloom well?
Issues like insufficient sunlight, overcrowding, overwatering, high nitrogen levels or drastic temperature shifts can all interfere with prolific flowering. Meeting preferred growing conditions, fertilizing judiciously, pruning back competing foliage and deadheading spent blooms helps tip the balance towards improved flowering.


